

此內容僅提供英文版本。
Before a Training Event
- Add Training
- Step 1: Click “Training Sponsor Tools”
- Step 2: Select “Add Training” and complete fields (Video 00:58)
- Step 3: When finished, select “Submit” (Video 2:34)
- Create an Event (Video 2:40)
- Step 1: Click “Training Sponsor Tools”
- Step 2: Select “Event Management” or for Instructors, “Instructor Tools” (Video 2:55)
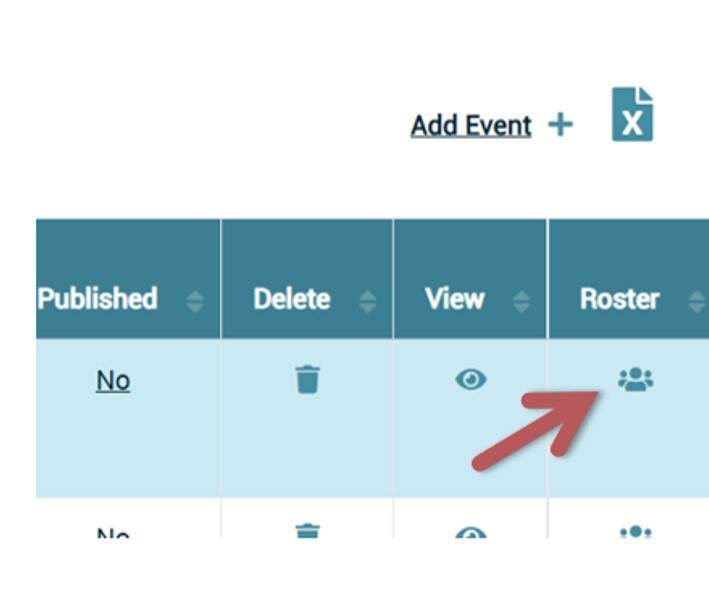
- Step 3: Click on “Add Event” (upper right hand side of screen – see image below) (Video 3:05)
- Step 4: Complete fields (For additional information on Program Codes see State Reporting Video)
After a Training Event
- Confirm attendance (Video 6:25)
- Step 1: Click “Training Sponsor Tools”
- Step 2: Select “Event Management” and click on the “Roster” icon (see image)
- Step 3: Either select “Mark all as Attended” or
- Adding Participants who did not enroll on the Registry:
- Click “Add Non-Enrolled Attendees” (blue button)
- Type in participants’ Registry ID # and “Add to Roster.”
Attendee Codes for State Reporting (State Reporting Video)
Attendee Codes can only be updated; 1.) after the event has taken place, 2.) attendance has been confirmed (Video 3:35), and 3.) event must have a Primary Program Code (Video 1:23)
- Step 1: Click “Training Sponsor Tools” and “Event Management”
- Step 2: Select “Roster” (icon at the end of event – see image above)
- Step 3: Select “CDE/F5 Attendee Coding” (Video 4:30)
To add a trainer, who will provide trainings for your organization, including Contact/Sponsor Managers, the instructor must request access to the training calendar by doing the following:
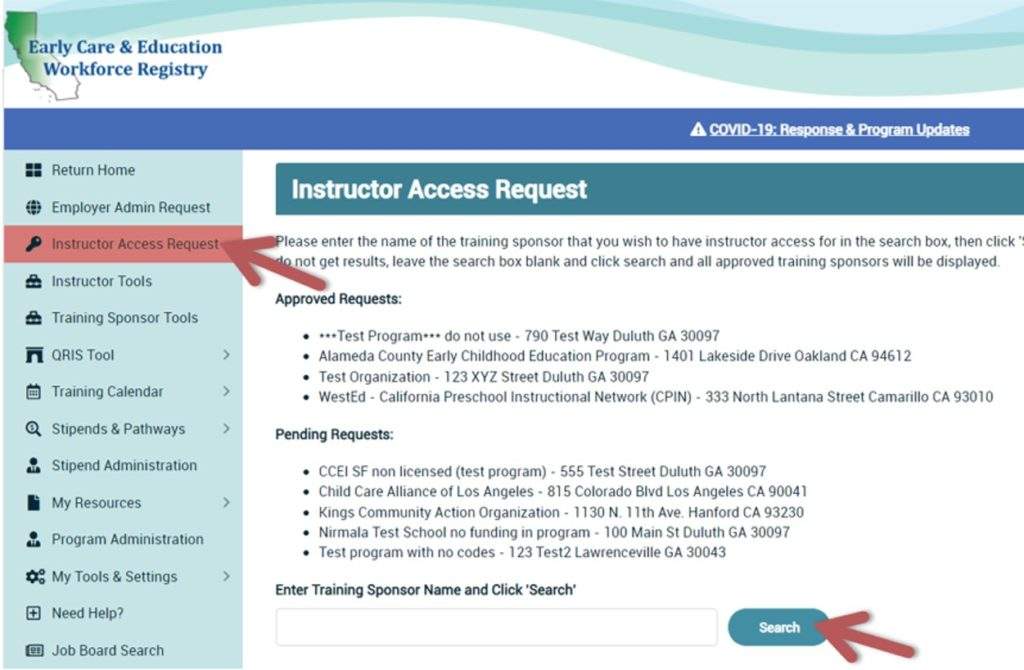
- The instructor must first have a Registry profile, login to his/her profile, with their work email address, and click Instructor Access Request on the navigation bar. The Instructor Access Request page will pop up.
- The instructor will type in the name of your organization and click Search.
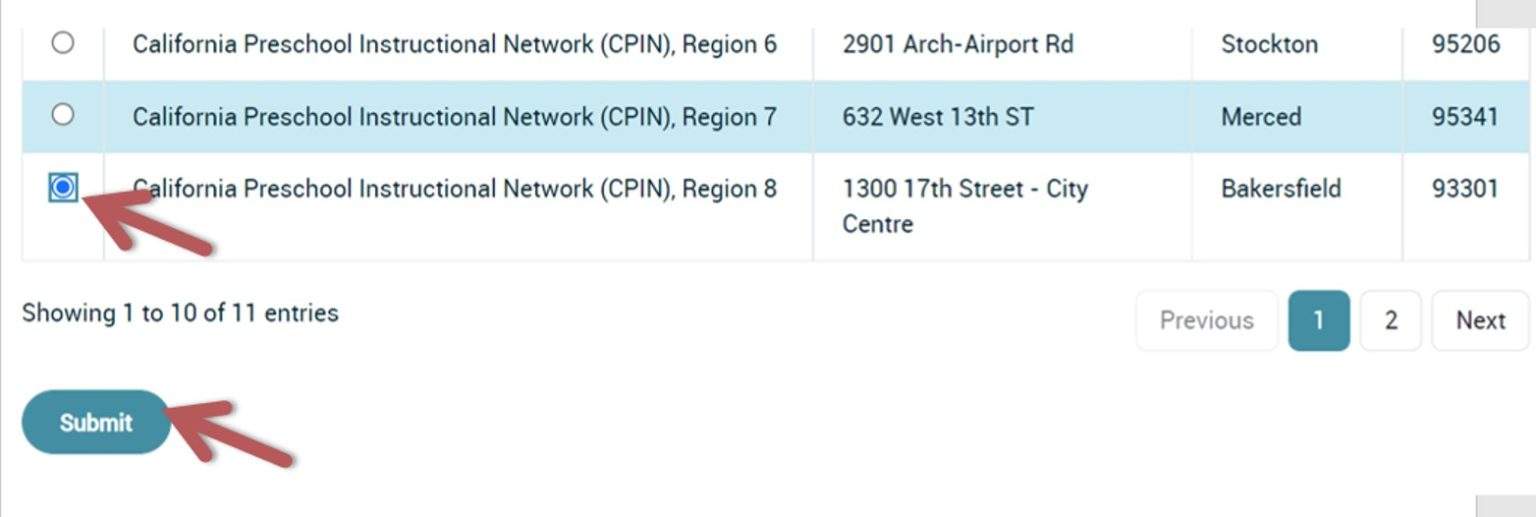
- The instructor will click the circle next to your organization and click Submit.
- A successful submission will result in “Pending Requests” and/or “Approved Requests” being listed.
- At this point, the instructor must wait for your approval to proceed with the Instructor Tools.
The following are instructions for sharing a link for a training events entered in Event Management, that is on the CA ECE Workforce Registry whether it is Published or unpublished on the Training Calendar.
Invite Targeted Audience to Training Events
If you want to share a training with a specific targeted group, you can email potential trainees a url link.
- When you are logged in as an Instructor or Sponsor, go to either the Instructor Tools or Training Sponsor Tools accordingly, and then select Event Management.
- Find the training you wish to share and then click on the View icon.


- From the Training Event Details page, select Share this Event, which is at the bottom right hand side of the screen (see image to the right). Then copy the url, which you can then paste into your invitation or link.
- When you send an email, to share your training url, make sure you instruct the training participants to log into the Registry to continue the enrollment process. If they are logged in, they will be able to enroll in the training. You will be able to see them on your roster once they enroll.
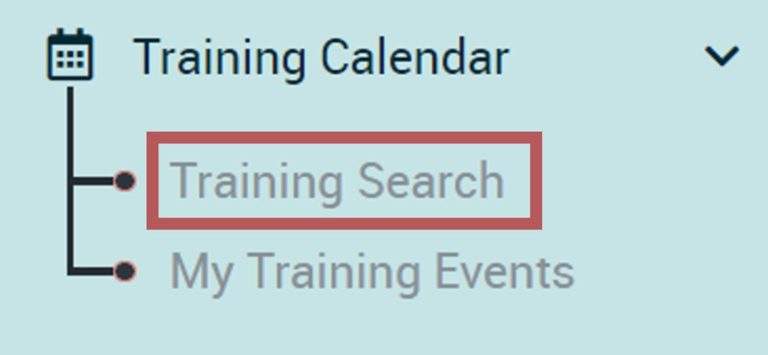
Training participants can check their enrollments by going to Training Calendar and clicking on My Training Events (see image).
How can you help training participants easily find your trainings on the Registry?
By “Publishing” trainings on the Registry, participants can easily search for and enroll in trainings.
If you have a cohort of training participants, would like to limit training participants to in-county, or some other reason you do not want to publish, you can choice to do that (Instructions for Unpublished Trainings – How to Share an Event – NEW).
Share resource with your participants from the How to Enroll or Withdraw from a training.
Training Titles:
- Use the same training titles in advertising as you use when entering the trainings on the Registry.
- Language of Training: for languages other than English, title can be entered in Language of Training and then enter a “/” with the title in English.
Use Event Notes to give detailed information about training logistics including when participants will be sent a password or training link, when attendance will be confirmed, or who can join the training. Event Notes should be in the language of the training.
Remember to Confirm Attendance of participants as soon as possible so that attendees can find the training on their Registry Education and Training Report.
If you issue a certificate AND enter a training on the Registry Training Calendar – Please print a notice on certificate to inform participants to NOT UPLOAD THE CERTIFICATE ON THEIR REGISTRY PROFILE.